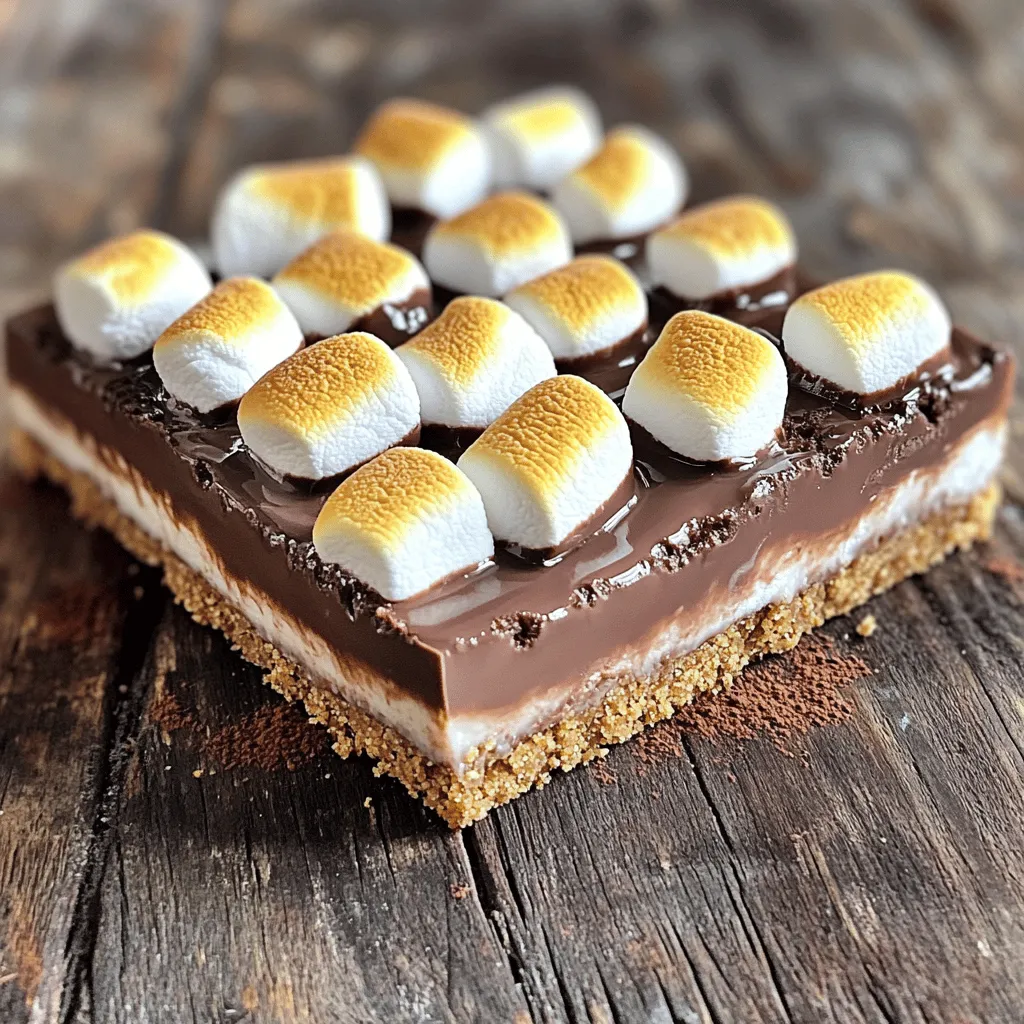
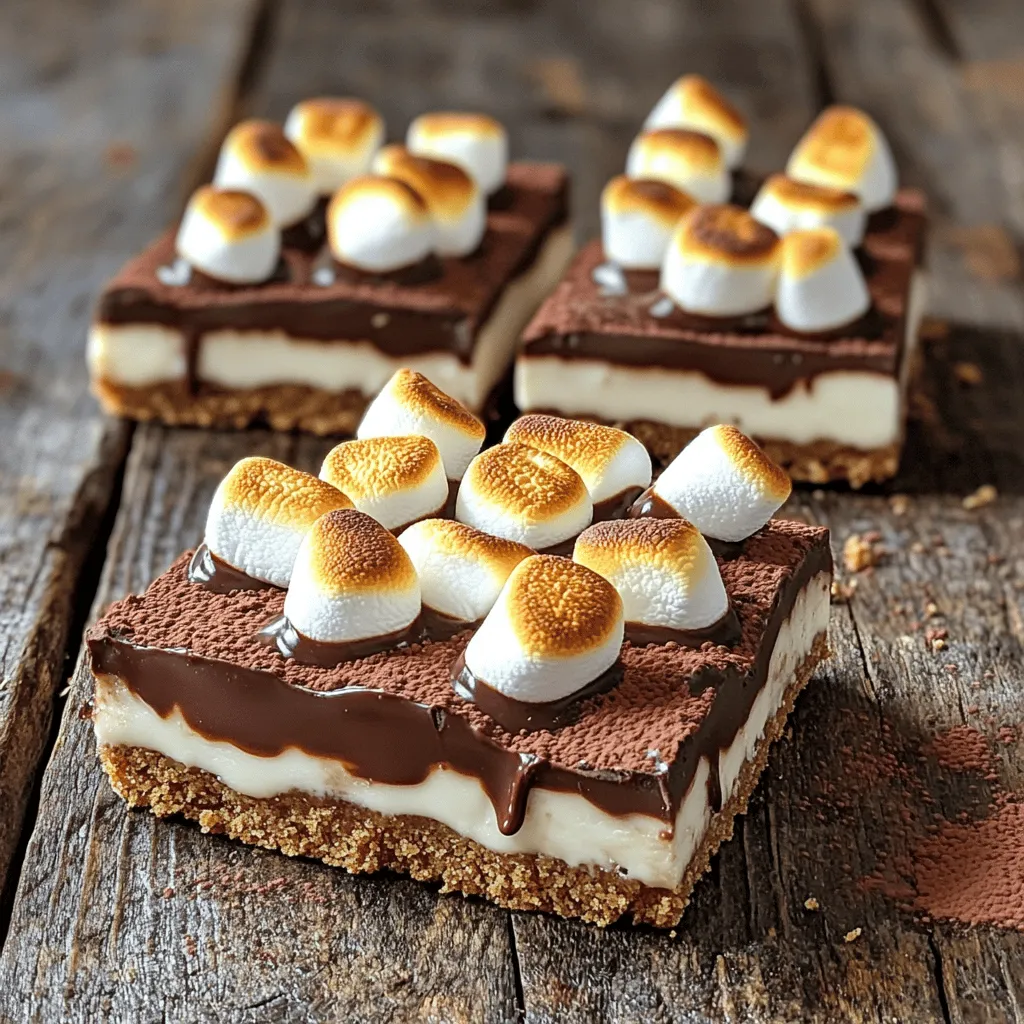
Craving a sweet treat without turning on the oven? You’re in the right place! With my easy no-bake S’mores bars recipe, you’ll whip up a delicious dessert in no time. Imagine a crunchy graham cracker base, smooth chocolate, and a gooey marshmallow topping—all without any baking. Let’s dive into this simple recipe that will amaze your taste buds and impress your friends!Cocoa powder adds rich flavor. Sugar sweetens the mix, while butter helps hold it all together. Mini marshmallows give that classic s’mores taste. Milk chocolate chips melt beautifully, creating a smooth layer. Heavy cream ensures the chocolate stays creamy. Vanilla extract adds a hint of warmth, while salt enhances all the flavors.
Recommended Brands for Ingredients
For the best results, I suggest using these brands:
– Graham Cracker Crumbs: Honey Maid or Nabisco
– Unsweetened Cocoa Powder: Hershey’s or Ghirardelli
– Sugar: Domino or C&H
– Unsalted Butter: Land O’Lakes or Kerrygold
– Mini Marshmallows: Kraft or Jet-Puffed
– Milk Chocolate Chips: Toll House or Ghirardelli
– Heavy Cream: Horizon Organic or Land O’Lakes
Choosing the right brands can enhance the taste and texture of your bars. Always check for freshness and quality in your ingredients.
Step-by-Step Instructions
Preparation of the Graham Cracker Crust
Start by gathering your ingredients. You need graham cracker crumbs, cocoa powder, sugar, and melted butter. In a large bowl, mix the graham cracker crumbs, cocoa powder, and sugar together. This mix should be well combined. Next, pour in the melted butter. Stir until the crumbs are coated and look like wet sand.
Now, it’s time to form the crust. Take a 9×9-inch baking pan and press the mixture firmly into the bottom. Make sure you cover the entire base. Press it down well to create a solid crust that will hold the bars together.
Melting the Chocolate Layer
For the chocolate layer, grab a small saucepan. Pour in the heavy cream and heat it over medium heat. Watch it closely until it just starts to simmer. Remove the pan from the heat. Now, add the milk chocolate chips to the cream. Stir well until the chocolate melts and becomes smooth.
Pour this melted chocolate over the graham cracker crust. Use a spatula to spread it evenly. Make sure every bit of the crust is covered. This layer adds richness and creaminess to your bars.
Broiling the Marshmallow Topping
Next, it’s time for the marshmallows. Take the mini marshmallows and sprinkle them over the chocolate layer. Be generous! Now, place the pan under the broiler for 1-2 minutes. Keep a close eye on them. You want the marshmallows to get golden brown, not burnt.
Once they look perfect, carefully remove the pan from the oven. Let it cool at room temperature for about 30-45 minutes. After that, refrigerate it for another 30 minutes. This helps the bars set up well. Once set, cut them into bars and enjoy!
Tips & Tricks
How to Achieve the Perfect Graham Crust
To make a great graham crust, start with fresh graham cracker crumbs. Use a food processor for a fine texture. Combine the crumbs with cocoa powder and sugar. Mix in melted butter until it feels like wet sand. Press the mixture firmly into the pan. A firm crust helps the bars hold shape.
Ensuring Smooth Melted Chocolate
For smooth melted chocolate, heat heavy cream in a saucepan. Stir it until it just simmers, then remove it from the heat. Add the chocolate chips and let them sit for a minute. This helps them melt gently. Stir until the mix is smooth and shiny. This step is key for a creamy layer.
Techniques for Toasting Marshmallows Carefully
To toast marshmallows, place them under the broiler for a short time. Keep a close eye on them. They can go from perfect to burnt quickly. Toasting should take 1-2 minutes. When they are golden brown, take them out. This gives your bars that classic s’mores taste and look.
Variations
Adding Flavorful Mix-ins
You can make your no-bake s’mores bars even more fun! Try adding in some tasty mix-ins. Nuts, like walnuts or almonds, give a nice crunch. You can also add different kinds of chips. Peanut butter chips or butterscotch chips work well too. Just mix them in with the chocolate layer for extra flavor. You can even swap some graham cracker crumbs for crushed cookies. Oreos or digestive biscuits can add a twist to the taste.
Gluten-Free Options
If you or your friends need gluten-free treats, do not worry! You can use gluten-free graham crackers. These can be found in many stores now. Simply follow the same steps in the recipe. You can also use gluten-free cookies if you want a different flavor. Just check the labels to ensure they are safe for your diet. Your bars will still taste great without gluten.
Alternative Chocolate Choices
Chocolate lovers have many options! Instead of milk chocolate, you can use dark chocolate or white chocolate. Each type gives a unique taste to your bars. Dark chocolate adds richness, while white chocolate adds sweetness. You can even mix different types of chocolate for a layered effect. This way, you get a blend of flavors that everyone will love. Experiment with what you like best and enjoy the different taste experiences!
Storage Info
Best Ways to Store No-Bake S’mores Bars
To keep your No-Bake S’mores Bars fresh, store them in an airtight container. This helps prevent drying out and keeps them tasty. If you have leftover bars, let them cool completely first. Then, cut them into squares and layer them with parchment paper in the container. This way, they won’t stick together.
Freezing Instructions
You can freeze these bars for longer storage. First, wrap each bar in plastic wrap. Then, place the wrapped bars in a freezer-safe bag or container. Make sure to remove as much air as possible. When you want to enjoy them, just thaw them in the fridge overnight. They will taste just as good!
Shelf Life and Serving Suggestions
No-Bake S’mores Bars last up to a week in the fridge. For the best taste, serve them cold or at room temperature. You can top them with extra mini marshmallows or chocolate drizzle for added fun. This makes for a great treat at parties or family gatherings. Enjoy your delicious creation!
FAQs
Can I make these bars in advance?
Yes, you can make these bars ahead of time. They stay fresh for up to a week in the fridge. Just prepare them as the recipe shows. Once they cool, cover them tightly. This helps keep them fresh and tasty. You can also freeze them for longer storage. Just cut them into bars before freezing. Wrap each bar in plastic wrap. Then, store them in a freezer-safe bag.
What can I substitute for graham cracker crumbs?
If you don’t have graham cracker crumbs, use crushed cookies. Vanilla wafers or digestive biscuits work well. You can even use crushed pretzels for a salty twist. Just crush them into fine crumbs. Use the same amount as the recipe calls for. This makes it easy to stick to the crust layer.
How can I make these bars vegan?
To make these bars vegan, swap a few ingredients. Use vegan butter instead of regular butter. For the chocolate, choose dairy-free chocolate chips. You can also use coconut cream in place of heavy cream. This keeps the rich taste while making it vegan-friendly. Finally, use a vegan substitute for marshmallows. There are many brands that offer plant-based options. Enjoy your vegan twist on this classic treat!
This article covers how to make delicious no-bake s’mores bars. We discussed the key ingredients and brands that work best. The step-by-step instructions guide you from the crust to the toasted marshmallow topping. Tips help you perfect each layer, and variations offer fun twists. Storage info ensures your bars stay fresh.
Enjoy creating this treat anytime. With the right steps, you’ll impress family and friends. Happy baking!