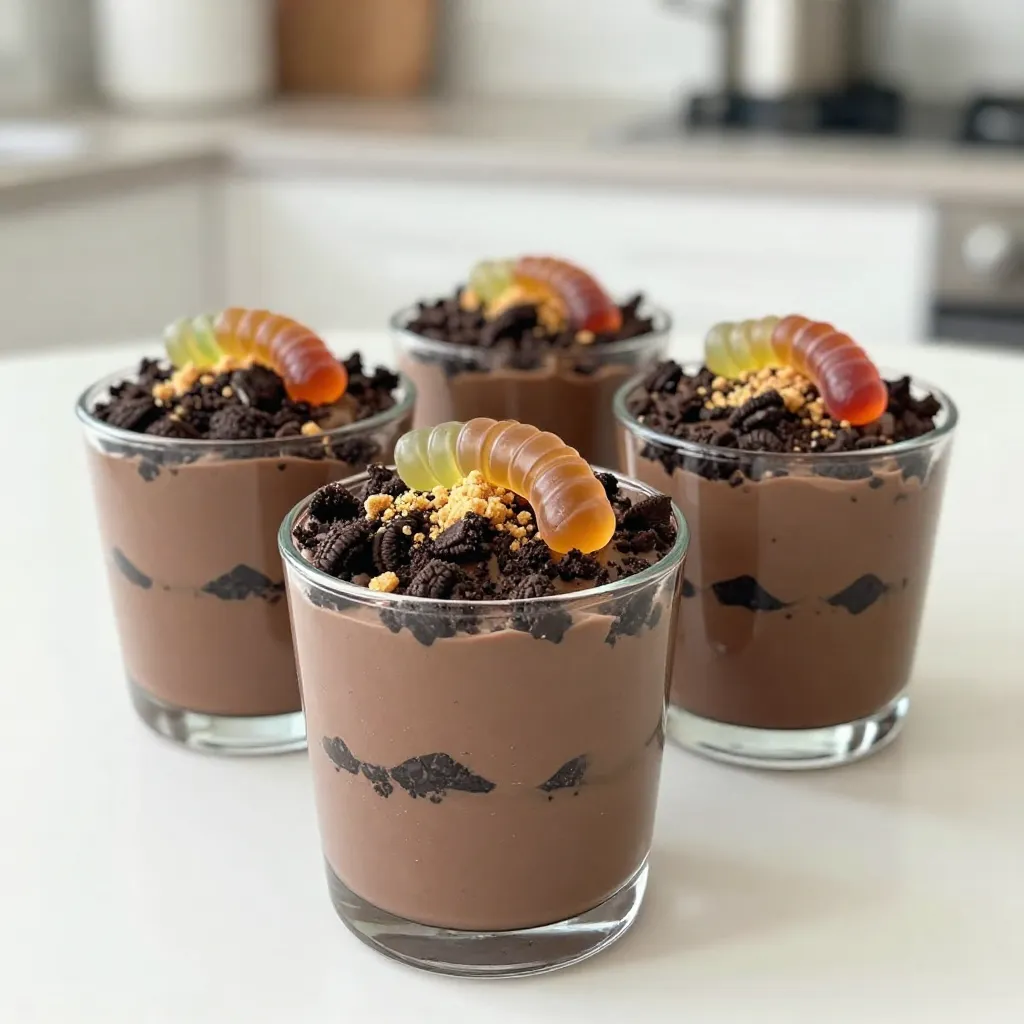
Looking for a fun and easy dessert? Let me show you how to make Oreo Dirt Pudding Cups! This simple treat combines creamy pudding, crushed Oreos, and sweet toppings for a delightful experience. Whether you’re hosting a party or treating your kids, these cups are sure to impress! Follow along as I guide you through the ingredients, steps, and tips to make this tasty dessert a hit. Let’s get started!
Why I Love This Recipe
- Kid-Friendly Fun: This recipe is perfect for kids! The combination of chocolate pudding and Oreo cookies makes it a delightful treat that everyone will love.
- Easy to Make: With simple steps and minimal ingredients, this dessert can be whipped up in no time, making it ideal for last-minute gatherings.
- Customizable Layers: You can easily mix and match the layers and toppings to suit your taste, whether you prefer more gummy worms or extra cookie crumbles.
- Perfect for Any Occasion: These pudding cups are great for parties, picnics, or even just a fun night in with family. They bring a playful touch to any dessert table!
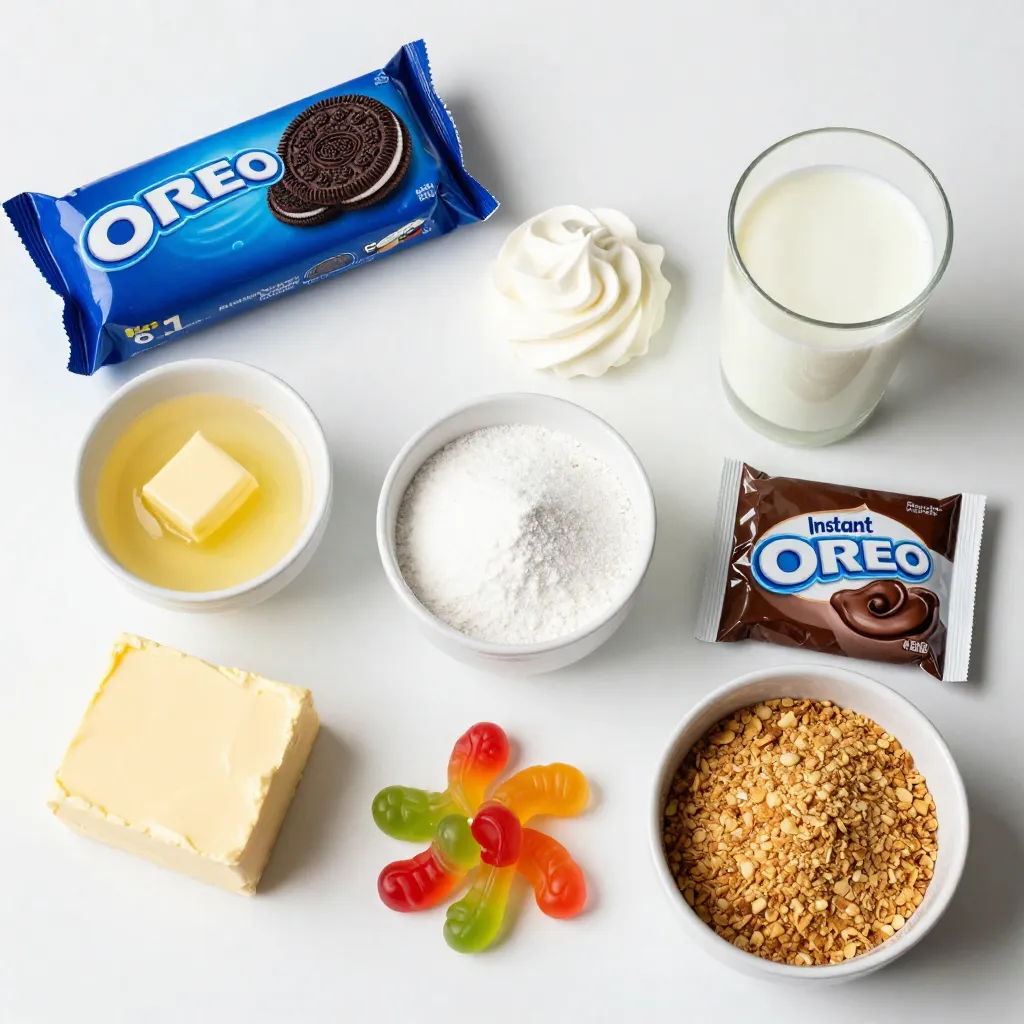
Ingredients
Oreo Cookies
You need one package of Oreo cookies, which weighs 18 ounces. These cookies form the base and the topping of our dessert. Their rich chocolate flavor gives a nice contrast to the creamy layers. Crushing them finely is key. You can use a food processor or a rolling pin for this task.
Required Dairy Products
For the creamy filling, you will need a few dairy items:
– 1/2 cup unsalted butter, melted
– 1 package (8 oz) cream cheese, softened
– 1 cup powdered sugar
– 1 cup whipped topping, like Cool Whip
– 2 cups milk
The cream cheese gives a rich texture, while the whipped topping adds airiness. The milk helps to make the pudding smooth and delicious.
Additional Toppings
To make your Oreo Dirt Pudding Cups fun and tasty, add some fun toppings:
– Gummy worms for a playful touch
– Edible soil or crushed graham crackers for texture
These toppings not only add flavor but also make the dessert look like real dirt! The gummy worms sneak in a playful vibe that kids will love.
Step-by-Step Instructions
Crushing the Oreos
To start, you need to crush the Oreos. Take 1 package of Oreo cookies and place them in a food processor. Pulse until they turn into fine crumbs. If you don’t have a food processor, you can use a zip-top bag. Just add the Oreos, seal the bag, and crush them with a rolling pin. You want nice, small pieces for the best texture.
Making the Oreo Base
Next, we will make the Oreo base. In a medium bowl, mix the crushed Oreos with 1/2 cup of melted butter. Stir well until the crumbs are fully coated. Set aside about 1 cup of this mixture. You will use this for topping later. This base gives the dessert that classic dirt look.
Preparing Cream Cheese Mixture
Now, it’s time to prepare the cream cheese mixture. In a large mixing bowl, add 1 package of softened cream cheese. Beat it with an electric mixer until it’s creamy. Gradually add in 1 cup of powdered sugar. Mix until smooth and well combined. This mixture will add a rich flavor to your dessert.
Mixing the Pudding
In another bowl, whisk together 2 cups of milk and 1 package of instant chocolate pudding mix. Mix for about 2 minutes until it thickens. This step is key to achieving the right pudding texture. Once it’s thick, gently fold this pudding into the cream cheese mixture. Make sure everything is smooth and well combined.
Assembling the Dessert
Finally, let’s assemble the dessert. Grab your serving cups or bowls. Start with a layer of the Oreo crust mixture at the bottom. Then add a layer of the chocolate pudding mixture on top. Repeat these layers until the cups are filled. Make sure to end with pudding on top. Sprinkle the reserved Oreo crust mixture over the pudding. Add a layer of edible soil or crushed graham crackers. Top it all off with a gummy worm for a fun touch that kids will love!
Tips & Tricks
Adjusting Sweetness
You can change the sweetness to fit your taste. If you like less sweet, use less powdered sugar. Try adding more cream cheese for a richer flavor. This mix will balance the dessert well. Taste as you go to find the right mix for you.
Layering Technique
Layering is key for a great look. Start with the Oreo crust at the bottom of your cup. Then add a layer of the creamy pudding mix. Repeat these layers until your cup is full. Make sure to end with pudding on top. This helps to hold your toppings better.
Presentation Suggestions
For a fun look, use clear cups. This way, you can see the layers. Add a gummy worm on top for a playful touch. You can also sprinkle edible soil or crushed graham crackers for texture. Chill the cups before serving to keep them fresh and tasty.
Pro Tips
- Crush Oreos Evenly: Ensure the Oreo cookies are crushed uniformly for a consistent texture throughout the pudding cups.
- Chill Before Serving: Allow the pudding cups to chill for at least 2 hours; this helps the layers set properly and enhances the flavors.
- Use Clear Cups: Opt for clear cups to showcase the beautiful layers of the dessert; it adds visual appeal and excitement for the guests.
- Experiment with Toppings: Try different toppings like crushed nuts or sprinkles for added crunch and color to your dirt pudding cups.
Variations
Different Flavor Puddings
You can change the flavor of the pudding to mix things up. Instead of chocolate, try vanilla or butterscotch pudding. You can make this dessert your own by picking your favorite flavor. Just follow the same steps using your chosen pudding mix. The creamy layers will still taste great!
Gluten-Free Options
You can easily make this dessert gluten-free. Use gluten-free Oreo cookies, which are available at many stores. Check the packaging to ensure they are safe for your diet. The rest of the recipe stays the same. Your friends will never know the difference!
Dairy-Free Substitutes
For a dairy-free version, you can swap out some ingredients. Use dairy-free cream cheese and whipped topping. Almond or soy milk works well in place of regular milk. These simple changes keep the dessert tasty and creamy. You will enjoy the same fun flavors without the dairy!
Storage Info
Refrigeration Tips
Store your Oreo Dirt Pudding Cups in the fridge. Use an airtight container to keep them fresh. Make sure they chill for at least two hours before serving. This helps the flavors blend well. You can enjoy them cold, which makes each bite refreshing and creamy.
Freezing Instructions
You can freeze the Oreo Dirt Pudding Cups if you want to save some for later. Just cover each cup tightly with plastic wrap or place them in a freezer-safe container. They can last up to two months in the freezer. When you’re ready to eat them, transfer the cups to the fridge overnight to thaw. Do not freeze the gummy worms; add them after thawing.
Best Practices for Leftovers
If you have leftovers, keep them stored in the fridge. They should stay fresh for about three days. Check for any changes in texture or flavor before eating. You can add more crushed Oreos on top for a fresh look and taste. Enjoy the layers of chocolate and cream even after the first day!
FAQs
Can I make Oreo Dirt Pudding Cups ahead of time?
Yes, you can make Oreo Dirt Pudding Cups ahead of time. They taste great after a few hours in the fridge. I like to make them the night before a party. This way, they chill well and the layers set nicely.
How long do Oreo Dirt Pudding Cups last in the fridge?
Oreo Dirt Pudding Cups last about three days in the fridge. Keep them covered to stay fresh. If you add gummy worms, they may get a bit soggy. So, I suggest adding them just before serving.
What’s the best way to crush Oreo cookies?
The best way to crush Oreo cookies is to use a food processor. Just pulse until they are fine crumbs. If you don’t have one, place them in a zip-top bag. Then, use a rolling pin to crush them. This method works just as well!
In this post, we explored how to create delicious Oreo Dirt Pudding Cups. We covered ingredients like Oreo cookies, dairy products, and toppings. I shared simple steps for making the base and cream cheese mix. You learned tips for adjusting sweetness and presenting your cups well. We also discussed variations and storage methods to keep your dessert fresh.
Now, you’re ready to wow family and friends with this fun treat! Enjoy making your Oreo Dirt Pudding Cups, and don’t be afraid to mix things u