Looking for a fun and healthy meal? Try making Rainbow Veggie Sushi Rolls! These colorful treats are not just eye-catching; they’re loaded with fresh veggies and flavor. With simple steps, you can prepare delicious sushi at home. Forget complex recipes—this guide helps you create vibrant rolls that are perfect for any meal or snack. Let’s dive into the ingredients and get rolling!
Why I Love This Recipe
- Colorful Presentation: The vibrant colors of the veggies make this sushi visually stunning, appealing to both the eyes and the palate.
- Healthy Ingredients: Packed with fresh vegetables and healthy fats from avocado, these rolls are nutritious and satisfying.
- Customizable: You can easily swap out ingredients based on your preferences or what you have on hand, making it versatile.
- Fun to Make: Rolling sushi is a fun activity that you can enjoy alone or with family and friends, making it a great bonding experience.
Ingredients
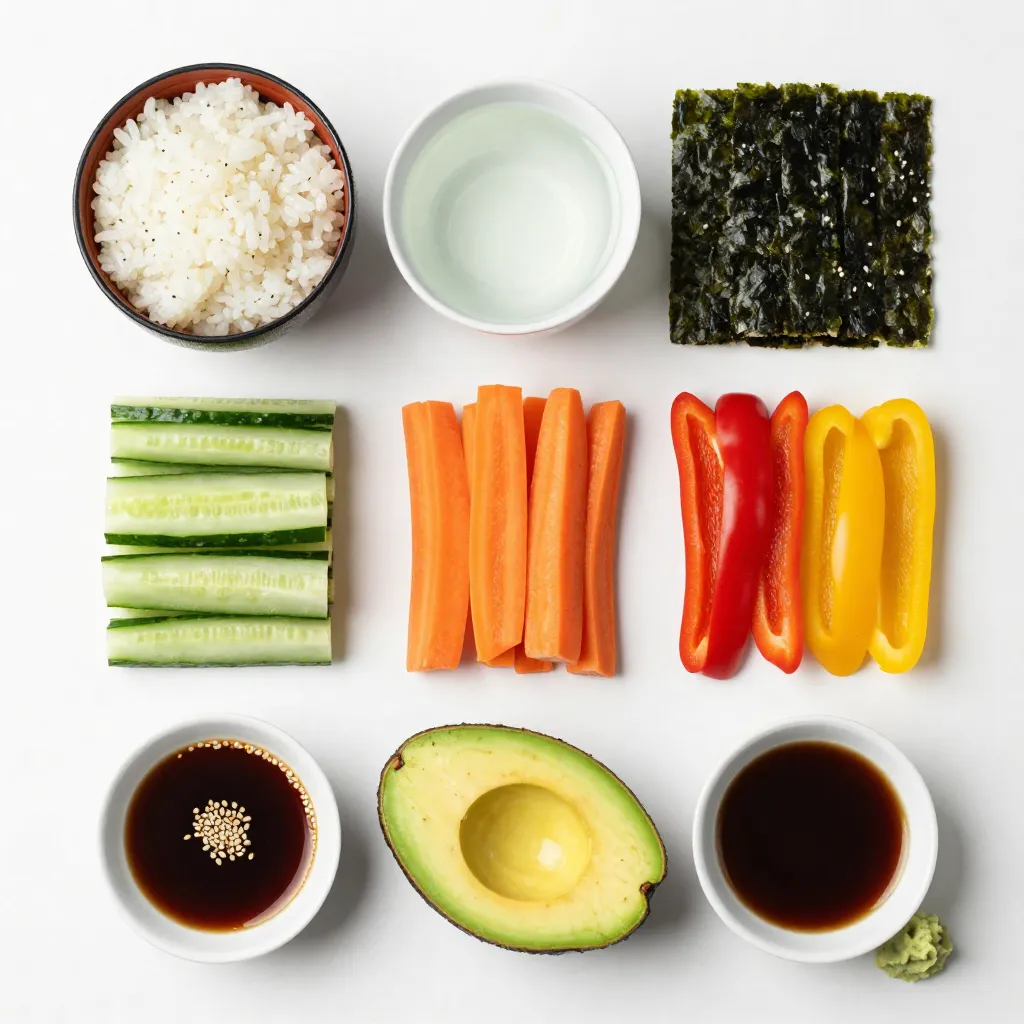
List of Required Ingredients
– 1 cup sushi rice
– 1 1/4 cups water
– 4 sheets nori (seaweed)
– 1 medium cucumber, julienned
– 1 medium carrot, julienned
– 1/2 red bell pepper, sliced into thin strips
– 1/2 yellow bell pepper, sliced into thin strips
– 1 medium avocado, thinly sliced
– 1/4 cup pickled ginger (for serving)
– Soy sauce (for dipping)
– Sesame seeds (for garnish)
– Wasabi (optional, for serving)
Gathering fresh ingredients is key for great sushi. Start with sushi rice. This rice is sticky and holds together well. You’ll need water to cook it. Next, choose colorful vegetables. I love using cucumber, carrot, and bell peppers. These add crunch and flavor. Don’t forget the creamy avocado; it makes your rolls rich and tasty.
You’ll need nori sheets, which are thin sheets of seaweed. They hold everything together. For flavor, use rice vinegar, salt, and a bit of sugar. These seasonings make your rice shine.
Lastly, think about garnishes. Sesame seeds add a nice touch. Pickled ginger cleans your palate. Soy sauce and wasabi are perfect for dipping. They enhance the sushi’s taste. Make sure to have everything ready before you start to roll!
Step-by-Step Instructions
Preparing the Sushi Rice
1. Rinsing the rice: Start by rinsing 1 cup of sushi rice under cold water. Rinse until the water runs clear. This step removes excess starch and helps the rice cook evenly.
2. Cooking method and timing: Combine the rinsed rice and 1 1/4 cups of water in a pot. Bring it to a boil over high heat. Once boiling, reduce the heat to low. Cover and let it simmer for 20 minutes or until the water is absorbed.
3. Cooling the rice: After cooking, remove the pot from heat and let it sit, covered, for another 10 minutes. Transfer the rice to a bowl. Add a splash of rice vinegar, a pinch of salt, and a dash of sugar for flavor. Mix gently and let it cool to room temperature.
Preparing the Fillings
1. Julienne and slice vegetables for filling: While the rice cools, prepare your veggies. Julienne 1 medium cucumber and 1 medium carrot. Slice 1/2 of a red bell pepper and 1/2 of a yellow bell pepper into thin strips. Thinly slice 1 medium avocado.
2. Arranging fillings for assembly: Place each prepared vegetable in separate bowls. This makes it easy to grab what you need when assembling your rolls.
Assembling the Sushi Rolls
1. Placement of nori and sushi rice: Lay a bamboo sushi mat on a clean surface. Place 1 sheet of nori, shiny side down, on the mat. Wet your hands to keep the rice from sticking. Grab a handful of sushi rice and spread it evenly over the nori, leaving about 1 inch at the top edge.
2. Layering the colorful fillings: Start layering your colorful fillings—cucumber, carrots, bell peppers, and avocado—in the center of the rice. Be careful not to overfill; this helps with rolling.
3. Rolling technique and sealing the roll: Lift the edge of the sushi mat closest to you. Start rolling it away from you, tucking in the filling as you go. Keep rolling while pulling gently on the mat to form a tight roll. Wet the top edge of the nori with water to seal it.
Slicing and Serving
1. Using the right knife technique: Use a sharp knife to slice the roll into bite-sized pieces. Wipe the blade with a damp cloth after each cut. This helps keep the edges clean and neat.
2. Plating presentation ideas: Arrange the sushi rolls on a beautiful platter. The colorful veggies should show on the cut sides, making them look inviting.
3. Suggestions for garnishing: Sprinkle sesame seeds over the top for crunch. Serve with pickled ginger, soy sauce, and wasabi on the side for added flavor. Enjoy this colorful and tasty treat!
Tips & Tricks
Techniques for Rolling Sushi
When making rainbow veggie sushi rolls, keep your hands wet. This helps the rice from sticking to your fingers. Wet hands make the process smoother and cleaner.
Use the right amount of rice. A handful is usually enough. Spread it evenly over the nori, leaving space at the top. The rice should cover most of the nori but not be too thick.
Common Mistakes to Avoid
Avoid overfilling your sushi rolls. Too many ingredients can cause the nori to tear. Only add a few strips of each veggie to keep it manageable.
Make sure to seal the roll properly. After rolling, wet the edge of the nori to help it stick. A tight seal keeps everything together when you slice it.
Enhancing Flavor
Rice vinegar is the best for sushi rice. It adds a nice tang and complements the veggies well. You can also try flavored rice vinegars for a twist.
To vary the flavors, think about adding different veggies or sauces. You can include spicy mayo or a drizzle of sesame oil. Experiment with your favorite tastes!
Pro Tips
- Use Fresh Ingredients: The quality of vegetables directly affects the flavor of your sushi. Always choose fresh, ripe produce for the best results.
- Moisten Your Hands: Wet your hands before handling sushi rice to prevent it from sticking. This makes the rolling process easier and cleaner.
- Experiment with Fillings: Feel free to mix and match different vegetables or even proteins like cooked shrimp or tofu for a unique twist on your sushi rolls.
- Sharp Knife for Slicing: Use a very sharp knife to slice your rolls. This ensures clean cuts and helps maintain the shape of your sushi without squishing it.
Variations
Dietary Substitutions
To make these sushi rolls fit your needs, try some easy swaps. For those who need gluten-free options, use tamari instead of regular soy sauce. Tamari gives a rich flavor without the gluten. If you want a vegan-friendly addition, consider adding tofu or tempeh. Both options add protein and texture. You can marinate them in some soy sauce or teriyaki sauce for extra taste.
Flavor and Ingredient Variations
You can play with the veggies in your sushi rolls. Try adding thinly sliced radishes for a peppery kick or some spinach for a fresh touch. You can also use sweet potatoes or beets for a colorful twist. When it comes to dips, think outside the box. Instead of soy sauce, try a spicy mayo or a tangy peanut sauce. These unique sauces can change your sushi experience.
Seasonal Ingredients
Take advantage of the seasons to keep your rolls fresh. In spring, use tender asparagus or snap peas for a crisp bite. Summer is perfect for colorful cherry tomatoes or zucchini. In fall, try roasted bell peppers or even pumpkin. You can also mix colors to fit festive occasions. Use red, green, and gold vegetables for a holiday theme. This way, your sushi rolls will not just taste good; they will look amazing too!
Storage Info
How to Store Leftover Sushi Rolls
To keep your sushi rolls fresh, refrigeration is key. Place the rolls in an airtight container. This helps avoid drying out. If you have some, add a damp paper towel. This keeps the sushi moist.
Wrap each roll in plastic wrap before placing them in a container. This extra layer helps shield them from air. Make sure to store them in the fridge right after you finish your meal.
Reheating Tips
Sushi is best enjoyed fresh, but if you have leftovers, you can reheat them carefully. Use a microwave on a low setting. Heat for just a few seconds to warm the rice. Avoid cooking it too long, as this can make it tough.
If the sushi contains raw fish, it’s best to discard it after a day. Cooked fish sushi can last a bit longer but still should be eaten quickly.
Shelf Life
Sushi rolls stay fresh for about 24 hours in the fridge. After that, the quality declines. Make sure to check for signs of spoilage. If the rice turns hard or the vegetables look wilted, it’s time to toss them. Trust your nose too; if it smells off, it’s best not to eat it.
FAQs
How do you make sushi rice?
To make sushi rice, start with high-quality sushi rice. Rinse the rice under cold water until the water runs clear. This removes excess starch. Next, combine one cup of rice with 1 1/4 cups of water in a pot. Bring it to a boil, then reduce the heat. Cover and let it simmer for 20 minutes. After that, remove it from heat and let it sit, covered, for 10 more minutes. This resting time is crucial. Once it’s done, mix in rice vinegar, a pinch of salt, and a dash of sugar. Let it cool to room temperature.
Can I use regular rice instead of sushi rice?
You can use regular rice, but the texture will change. Sushi rice is short-grain and sticky when cooked. It holds together well, which is important for sushi rolls. Other rice types, like long-grain or brown rice, will not stick as nicely. This means your rolls may fall apart. If you do not have sushi rice, use a medium-grain rice for better results.
What can I substitute for nori if I don’t have it?
If you lack nori, try using lettuce leaves or rice paper. Lettuce provides a fresh, crunchy texture. Rice paper is flexible and easy to roll. Both options create a fun twist on traditional sushi rolls. You can also use thinly sliced cucumber for a low-carb version. Each alternative gives a different flavor and texture.
Are Rainbow Veggie Sushi Rolls healthy?
Yes, Rainbow Veggie Sushi Rolls are healthy! They contain fresh vegetables like cucumber, carrots, and bell peppers. These veggies are full of vitamins and minerals. Avocado adds healthy fats, which are good for heart health. Sushi rice provides carbohydrates for energy. Overall, these rolls are colorful, tasty, and nutritious. Enjoy them as a light meal or snack!
You can now create delicious sushi at home using simple ingredients and steps. We covered key items you need, like sushi rice and fresh veggies. You learned how to prepare, assemble, and serve your rolls beautifully. Don’t forget the tips to avoid common mistakes! Finally, explore different flavors and options to make your sushi unique. Enjoy the process, get creative, and share your homemade sushi with friend